Blog
Wildlife Encounters: What to Do and How to Prevent Them
As much as we like to think of the mountains as “our backyard”, they are first and foremost a wilderness, as well as the home of few species that can pose a risk to humans. As a former wilderness guide as well as someone who spends a lot of solo time in the wilderness, I’ve had to become well-versed in dealing with potential animal encounters. While any animal can pose a risk when threatened, we’ll be focusing on the four most common predators folks may encounter on an average hike in the United States mountain west. Although having an aggressive wildlife encounter is unlikely, it’s good to know what to do just in case.
Grizzly Bears
The granddaddy of hiker horror stories. While this bear often plays a starring role in outdoorsmen’s nightmares, actual attacks by these formidable beasts are far less common. An average of around 30-40 attacks happen per year in North America, with only 2-3 fatal attacks reported. Statistics show the vast majority of encounters end without incident. However it is still smart to be bear aware when headed out into their territory, which includes the states of Montana, Wyoming, Idaho, Alaska, and a small portion of Washington.

Preventing an Encounter:
Try to hike in groups: Groups are generally louder and decrease your likelihood of startling a bear. Additionally, increased numbers decrease the likelihood of most animals risking an attack.
Keep your food securely stored according to area guidelines: This applies especially for camping, which usually means storing all food and other “smelly” objects, such as lotion and toothpaste, in bear lockers or bear canisters. Bears can also open car doors, so if you leave any food in your car be sure to store it out of sight and securely lock the doors.
Make noise to alert bears of your presence: A startled bear is more likely to attack, therefore stay aware of your surroundings and make noise to announce your presence to any bears that might be in the area. Some hikers carry bear bells, but singing, whistling and/or speaking loudly also work.
Bear spray: If the area you are recreating in is part of bear country, it might be a good idea to bring bear spray with you as a last line of defense. Make sure to keep it easily accessible and within close reach, attacks happen fast and you likely won’t have enough time to dig it out of your bag. A hip holster is a common way of carrying it. Additionally, make sure to familiarize yourself with how to use it before hitting the trail. Here’s a great video from Banff National Park explaining how to properly use bear spray.
When an Encounter Occurs:
If the bear hasn’t noticed you, walk away slowly and quietly while keeping an eye on the animal at all times
If the bear has taken notice of you, keep calm and identify yourself by talking to the bear in a normal, calm voice.
Do not run, this can trigger a bear’s instinct to chase you, and bears are much faster than humans. Climbing trees is also ill advised for dealing with bears, as most species can climb trees faster than humans can.
Pick up small children immediately.
Make yourself look as large as possible, wave your arms above your head slowly or use your pack or gear to make yourself appear larger. If with a group, stand closely together to appear as a larger mass. Ready your deterrent just in case the encounter takes a turn.
If the bear isn’t moving, try to calmly and slowly exit the area by walking sideways, keeping your eye on the bear. Don’t turn your back or run.
If the bear begins to follow you and isn’t deterred at this point, calmly and firmly stand your ground. Increase your noise level; talk louder, bang on pots and pans, and/or use noisemakers.
Be sure to always give the bear an escape route, a cornered animal will feel threatened and may attack.
If the bear is with cubs, do not try to approach them and never put yourself in between the cubs and the mother.
Use spray if an aggressive bear begins charging and is within 60 feet of you.
In case of an attack:
With grizzlies, there are two methods of dealing with an attack: play dead or fight back. The required course of action is best determined by the nature of the attack. Most brown bear s attack because they are responding defensively. Therefore if they no longer perceive you as a threat, they are more likely to leave you alone. Play dead by laying flat on your stomach with your legs spread out to make it more difficult for the bear to flip you over and access your vitals. Use your hands to protect your neck. Keep your backpack on if possible, it can act as a shield against your back.
If playing dead does not work and the attack is prolonged, fight back. The other scenarios where you should fight back rather than play dead are if the bear has attacked you in your tent or stalked you prior to attacking. Focus your assault on the bear’s face and use whatever you have at hand.

Black Bears
Luckily for nervous hikers nationwide, there are only a few states with relatively small populations of Grizzlies left in the US. We do however have quite a large population of black bears. I’ve encountered black bears many times while hiking and even a few times when walking around downtown Boulder. Remember that viral photo of the black bear falling out of a tree? That happened during my first year at CU just a few feet from my dorm hall. My already nervous parents were not stoked about that. While black bears are generally skittish and will usually run from people, they can still pose a threat so it’s good to know what to do if one takes interest in you.

Preventing an Encounter:
The ways of preventing an encounter with a black bear are the same as with grizzlies, hike in groups, make noise, secure scented items and food properly, and carry bear spray.
When an Encounter Occurs:
Keep calm and identify yourself by talking to the bear in a low, calm voice.
Do not run, this can trigger a bear’s instinct to chase you, and bears are much faster than humans
Pick up small children immediately
Make yourself look as large as possible, get to higher ground or use your pack or gear to make yourself appear larger.
If the bear isn’t moving, try to calmly and slowly exit the area by walking sideways, keeping your eye on the bear. Don’t turn your back or run. If the bear begins to follow you, calmly and firmly stand your ground.
Be sure to always give the bear an escape route, a cornered animal will feel threatened and may attack.
If the bear is with cubs, do not try to approach them and never put yourself in between the cubs and the mother.
In case of an attack:
While playing dead is the most commonly known advice for dealing with an attacking bear, this is only true for brown bear attacks. In the rare case of a black bear attack, you want to try to escape to a car or building if at all possible. If escape isn’t a possibility, fight back vigorously. Use whatever object you can find while kicking or hitting the bear’s face and muzzle.

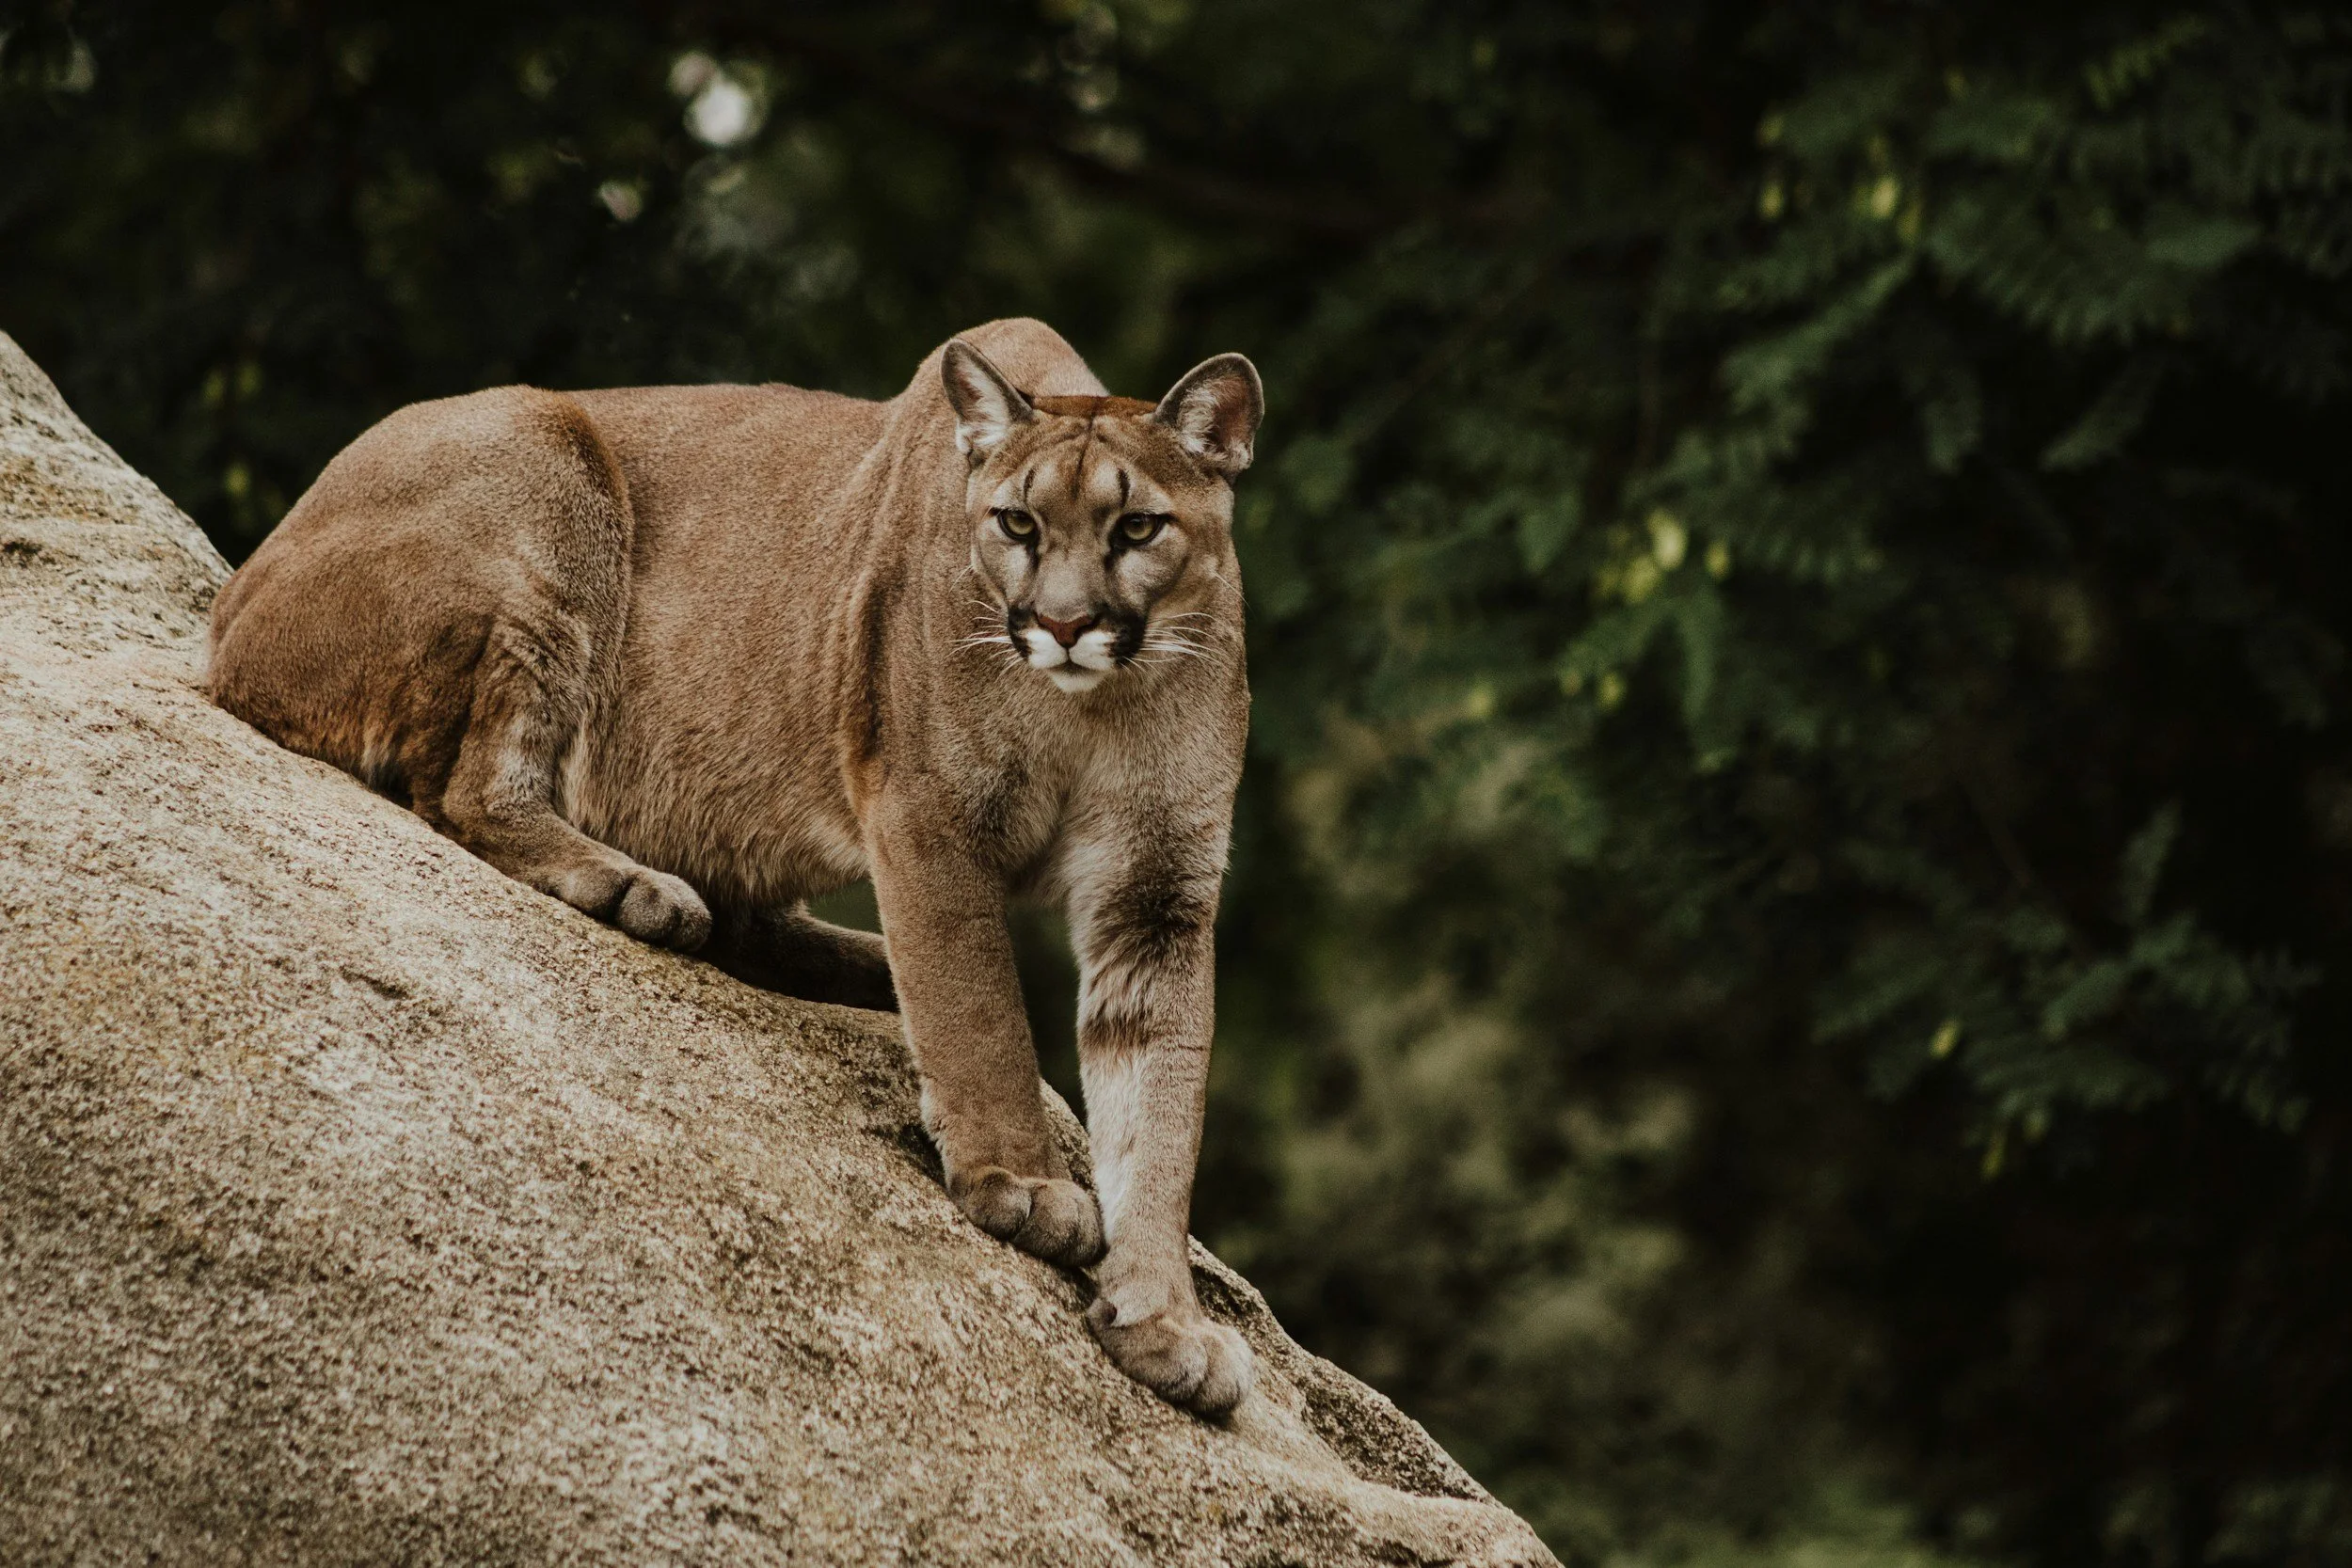
Mountain Lions
While you may not have personally seen a mountain lion while hiking, they have probably seen you. Mountain lions are generally elusive, quiet, and wary of humans. Attacks and encounters are very rare, but can happen. Here’s what to do should an encounter occur.
Preventing an Encounter
Hike in groups: Hiking in groups is always much safer than hiking alone. Just like with bears, a mountain lion is more likely to attack a solitary person rather than take on a whole group.
Keep small children and animals close to you: This is once again a case of avoiding presenting a mountain lion with easy prey.
Stay alert to your surroundings: Make periodic checks behind you. Mountain lions have been known to stalk from behind. Do you best to prevent them from getting the jump on you as well as avoid startling one.
When an Encounter Occurs
Stay calm
Do not run, mountain lions have a strong chase instinct. Make eye contact and stand your ground.
Do not approach the lion, make sure the animal has an open escape route. Most mountain lions want to avoid humans, make it easy for them to do so.
Avoid bending over, squatting or crouching, this can cause humans to appear as four legged prey animals.
If the Mountain Lion Approaches You and Shows Signs of Aggression:
Make yourself appear larger, spread arms and wave them slowly, speaking to the lion in a low, calm voice. If you’re wearing a jacket, spread it open to appear larger.
If the lion is not deterred, throw rocks, sticks or any nearby objects you can grab without bending over or turning around. Throw towards it’s direction, the goal of this is not to hit the lion yet, but to show it that you can fight back.
If the lion is still approaching, begin throwing objects at it with the intention of hitting it.
In the case of an attack
Fight back! Try to remain standing to prevent the cat from getting a hold of your head and neck. Use any objects available; people have successfully fought off lions using rocks, sticks, and their bare hands. Your backpack can also be used as a shield.

Moose
Some may be surprised to see moose on this list. However, moose are one of the most dangerous animals in North America. In Alaska alone, there is an average of 3-4 bear attacks per year compared to 5-10 injuries caused by moose each year. While moose aren’t typically outwardly aggressive, they can become aggressive quickly when startled or harassed by humans and dogs. So here’s what to do in a moose encounter.

Preventing an Encounter
Be Aware: Males are generally more aggressive in the Fall during the rut, and females are more aggressive in the Spring during calving.
Keep your dogs close and on leash: Moose have a strong aversion to dogs, and dogs will sometimes try to chase moose which can provoke an attack. Keep you and your pup safe by keeping them leashed.
Make noise while hiking: Similar to bears, the key to avoiding an unpleasant moose encounter is to avoid startling them.
Never try to feed or approach a moose: Each year I see tourists venturing uncomfortably close to moose for a picture or because they don’t know any better. Do not do this, they are extremely large animals and can cause a lot of damage.
When an Encounter Occurs
Give the moose plenty of space, allow it a clear escape route.
Talk calmly and back away slowly.
Do not approach, yell, or throw things. This can agitate the moose and is unlikely to prevent an attack.
Know moose behavior so you can understand when an attack might occur. Signs of aggression in a moose include lowering their heads, licking their snout, pinning their ears back, and raised hair on their hackles.
This video is an excellent example of a moose displaying aggression behaviors. It’s also a good example of what not to do when confronted with an aggressive moose. While the man does succeed in speaking calmly to the moose, he stands his ground instead of backing away slowly. He’s also way too close in the first place, but I’m going to give him the benefit of the doubt here and hope he didn’t intentionally put himself in this position.
In the Case of an Attack
If you are charged or chased by a moose, try to put something solid, such as a tree, between you and the animal. I’ve been unlucky enough to be charged by three moose at the same time, but managed to avoid an attack by hiding behind a large rock.
Play dead, just like in a grizzly attack. However unlike a grizzly attack, you want to curl yourself into a ball and protect your head, rather than lay flat.
Check out this video from Colorado Parks and Wildlife for more info:
While the main focus of this list is dangerous wildlife, many of these tips are best practices for wildlife encounters in general. Do not approach wild animals of any kind. Even species that are perceived to be mostly docile, such as elk or deer, can become aggressive or agitated if approached. Besides the risk the animal poses to you, your behavior can have a negative impact on them as well. Every year, wild animals are killed due to interactions with humans. Remember the instance where a Yellowstone visitor tried to “rescue” a bison calf resulting in it’s euthanization? Even good intentions can cause undue stress, behavioral changes or death to wild animals. Additionally, feeding any wildlife, even the cutest little chipmunk, is bad for the animal. This causes them to associate humans with food, making them less wild and more susceptible to disease and potentially deadly interactions with humans. You are not Snow White. So when recreating, please keep in mind that Leave No Trace also applies to wildlife. Treat animals with the respect and reverence they deserve while visiting their home, and you likely won’t have any issues!
Best Colorado 14ers for Beginners
Summiting one of Colorado’s 14ers is an iconic rite of passage in the hiking world. Each summer, hundreds of thousands of hikers set out in the wee hours of the morning to conquer one of the fifty-eight sky high peaks in the state. In my time as a Colorado resident, I summited a grand total of thirteen 14ers, both as a guide and a normal off-the-clock hiker. My first was Long’s, which I was talked into doing to impress a cute boy. If you know anything about this infamous mountain, you’ll know its reputation as being one of the more dangerous 14ers in the state. Luckily, said cute boy had done the hike before and I made it up and back in one piece. However, when people ask me what mountains I would recommend for new peak baggers, Long’s is discerningly not on that list. So if you’ve found yourself daydreaming of standing at 14,000 feet above sea level but don’t know where to get started, here are my top five 14ers for beginners! And don’t worry, they’re still impressive enough for bragging rights to any outdoorsy cuties.
Grays Peak
Elevation Gain: 3,000’
Mileage: 7 miles RT
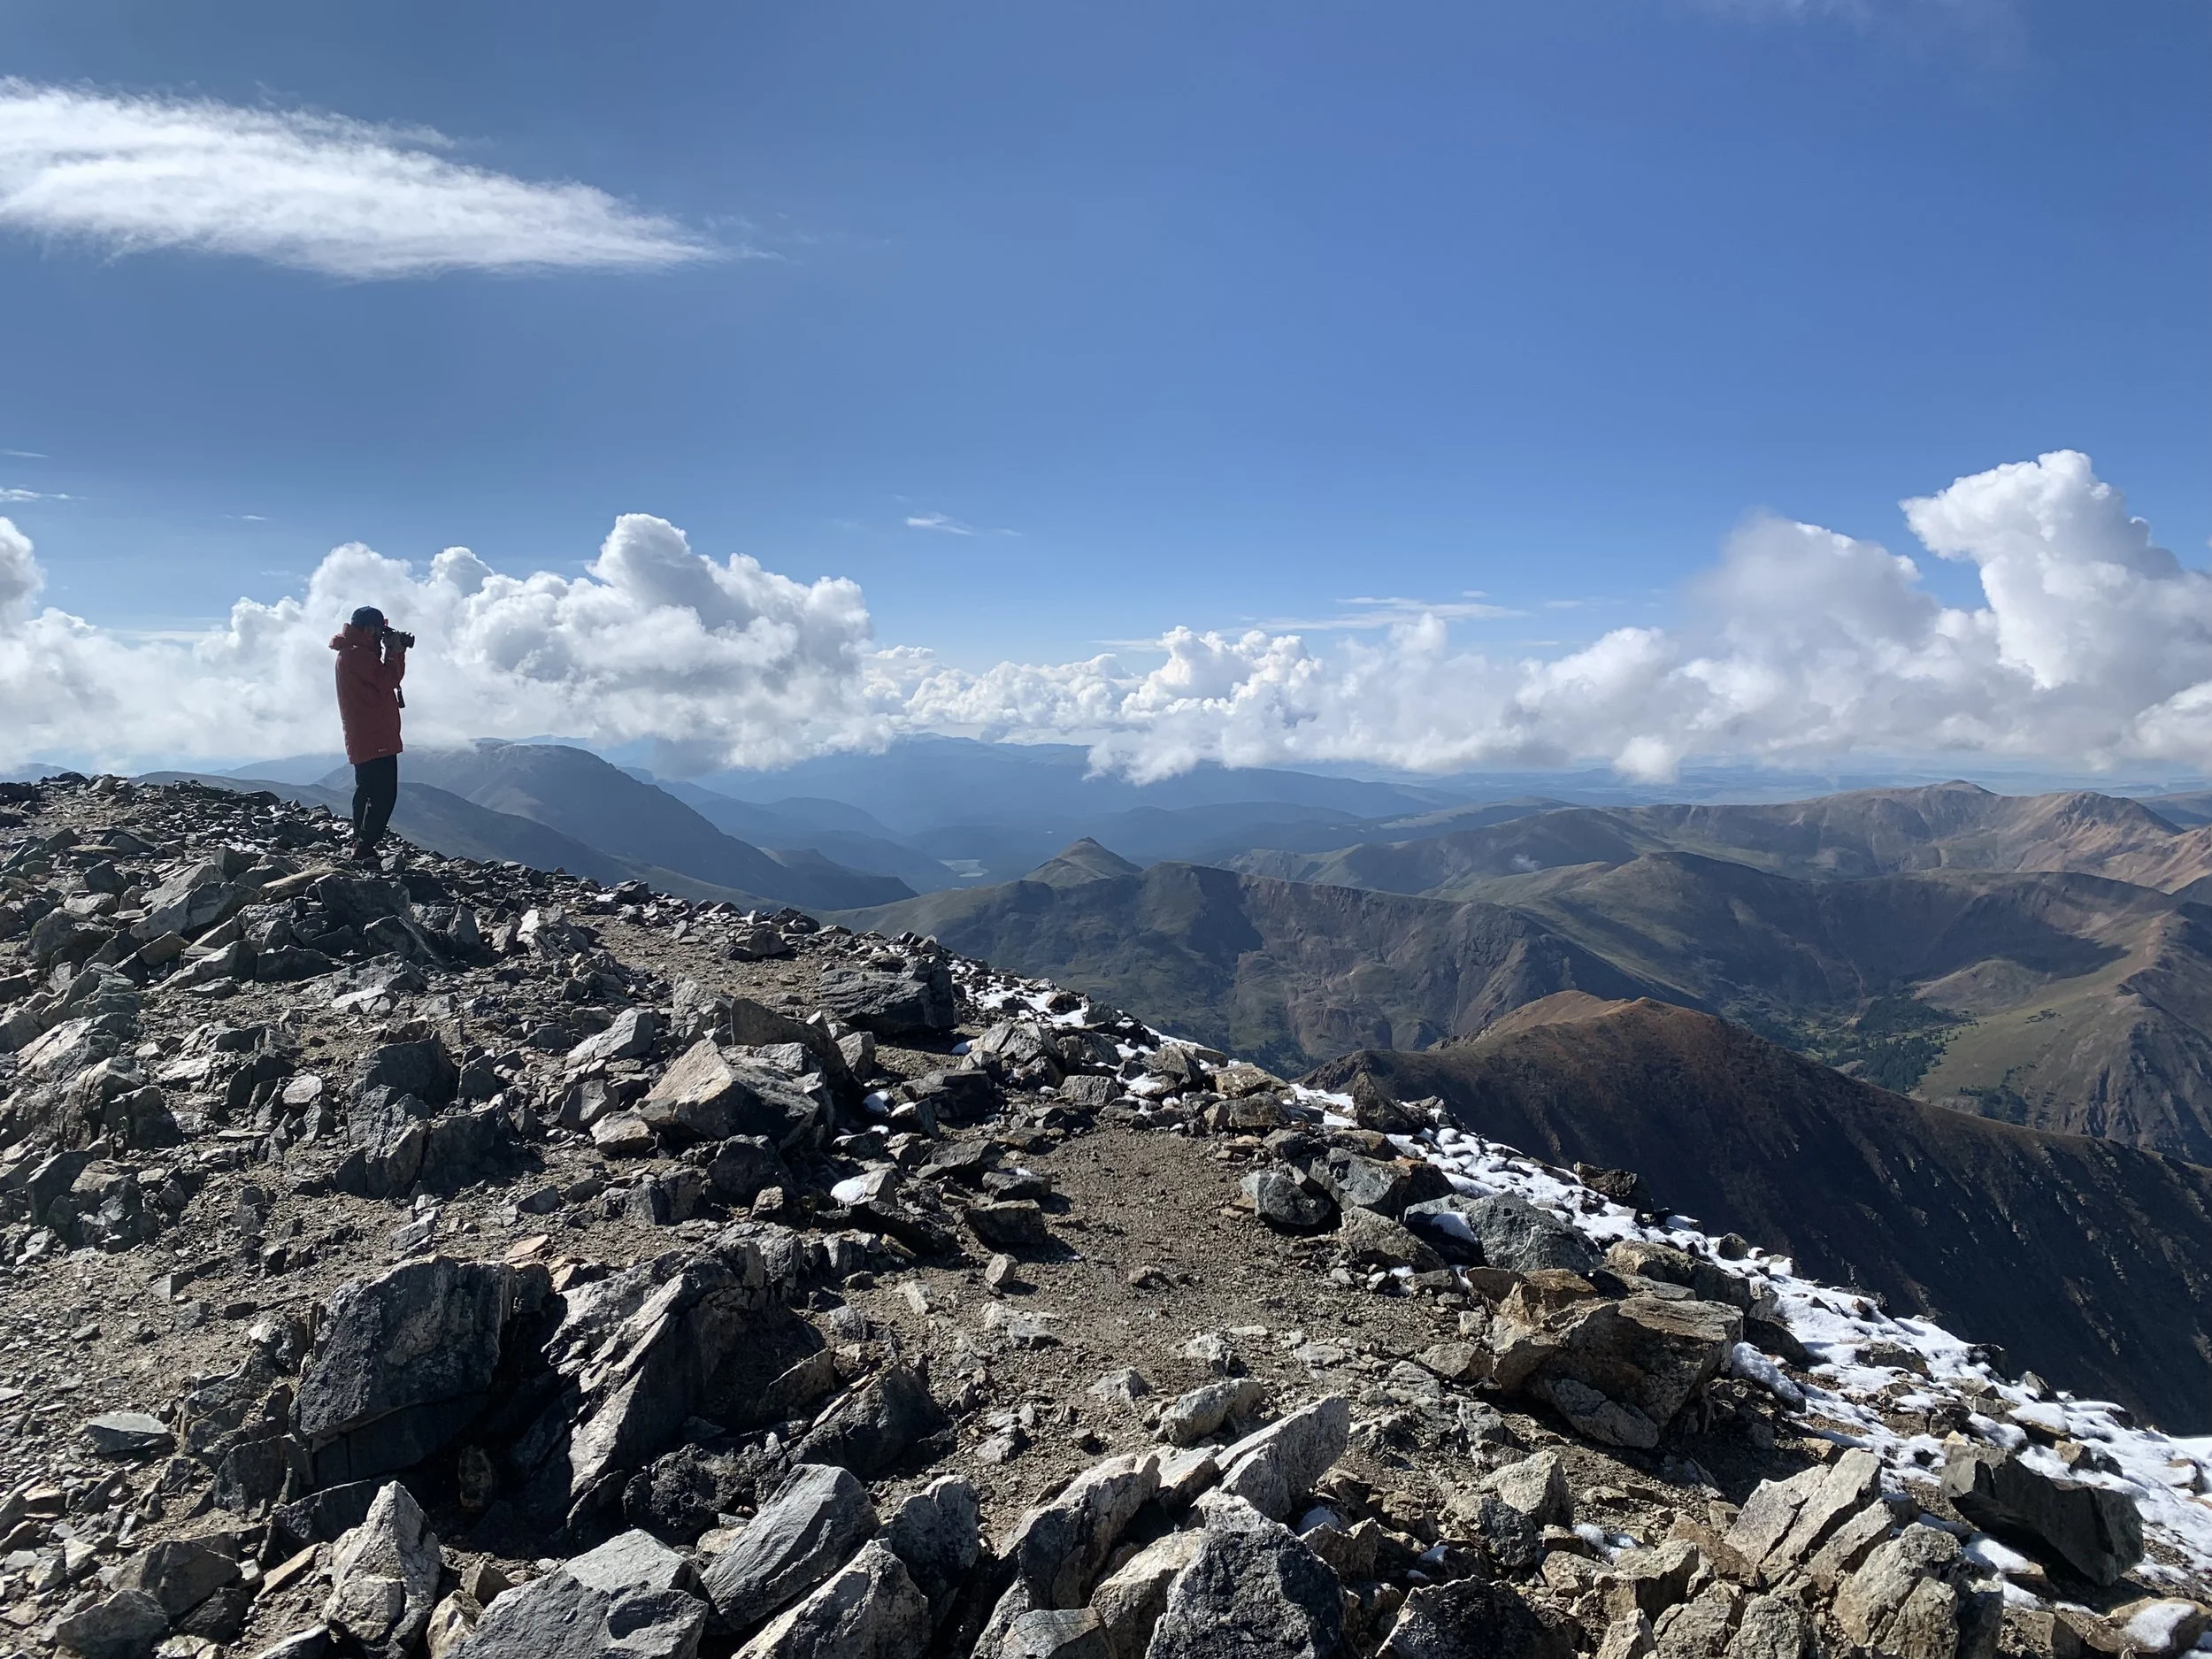
View from Gray’s summit
With a well-marked trail and relatively short hike, Grays’ is a popular choice for newbie peak baggers. This hike takes you through a stunning valley, past old mining ruins, up to a summit with breathtaking views of the Arapaho National Forest and Continental Divide. For those feeling more ambitious, they can continue on the 0.8 mile long saddle to nearby Torreys Peak and bag two summits in one day. If you choose this route, don’t be tempted by the seemingly shorter descent down Kelso Ridge. This route involves class 3 scrambling and is not suitable for beginners. You’re better off backtracking to the saddle between Gray’s and Torrey’s and following the trail down from there. Another note, the road up to the trailhead is notoriously rough, so a high clearance vehicle is strongly recommended.
Mt Bierstadt
Elevation Gain: 2,800’
Mileage: 7 Miles RT

My friend approaching the summit to Bierstadt, his first 14er!
Mt Blue Sky’s sister peak is slightly longer and slightly harder, but still a great choice for beginners. The hike to the top of Bierstadt starts at the scenic Guanella Pass Trailhead at about 11,600’ in elevation, giving you a nice leg up to the summit. Like Blue Sky, Mt Bierstadt’s proximity to Denver makes it a popular choice for peak baggers, so be sure to plan accordingly to ensure a parking spot. I first summited Bierstadt on a weekday in late September, and we only encountered a handful of other folks on the trail.
Mount Blue Sky
Elevation Gain: 2,000’
Mileage: 5.50 Miles RT
View of the summits of Mount Blue Sky and Bierstadt from Abyss Lake
Note: Be aware that part of Mount Blue Sky is closed this year due to construction, but it’s set to open again in the summer of 2026.
A short hike of only 5.5 miles and relatively low elevation gain compared to other peaks makes Blue Sky one of the easiest 14ers to climb. Another perk is the road to the top, meaning if you’re not feeling the descent, you can just arrange for a ride to meet you at the top! Its proximity to Denver and easy rep makes it a very popular choice however, so be sure to get an early start and avoid weekends for a less crowded experience. Noticing a theme here? Unfortunately if you’re searching for solitude, you’re not likely to find it on these peaks. Because these are some of the “easier” 14ers, you’ll likely be sharing the trail with quite a few other prospective peak baggers. But that can be an experience in and of itself. Make friends, share snacks and at least there will be someone else to take your picture at the top!
Mount Elbert
Elevation Gain: 4,700’
Mileage: 9.5 Miles RT

Although Elbert stands at 14,433’ making it the highest peak in Colorado, this 14er is still one of the easier ones to bag in the state. The trail is well marked and easy to follow, and is typically on most people’s lists. There are several routes to the top, but the northeast is the recommended one as the east ridge route requires a high clearance 4WD vehicle to reach the trailhead and the southeast route is not suitable for beginners. Be aware that this peak infamously has a few false summits, so don’t let it drop your morale!
Quandary Peak
Elevation Gain: 3,400’
Mileage: 6.75 Miles RT

A small herd of bighorn sheep, you might encounter a few of these guys on your hike.
Quandary has routinely snagged the title for “Most Summited Peak in Colorado” due to its accessibility from Denver and the resort town of Breckenridge and its reputation as being one of the more manageable peak ascents. Because of this, a reservation is needed to park at the trailhead from June-September. Summit County also conveniently offers a hiking shuttle from Breckenridge five days a week for $7 a person (although it’s free if you’re a summit county resident!). The recommended route for beginners is the East Ridge trail.

Trail towards Grays Peak
While these are considered “easier” peaks, they are by no means easy hikes so please do your research and prepare accordingly (unlike past me) before hitting the trails. I’ll be putting out a blog post on my tips for preparing to climb a 14er soon, so stay tuned!
Reading Weather in the Backcountry: The Basics
Anyone who recreates outdoors knows how important monitoring the weather can be. Since weather in the mountains can change on a dime, it’s important to understand what indicates it’s time to get off the mountain. In the beginning of my hiking career, I’ve found myself in less than ideal situations (cowering under a rock in a sudden, above-treeline hailstorm anyone?) because I didn’t heed the warning signs. So I put together a list of tips, tricks and info from my years of experience recreating in the mountains as well as knowledge I gained from my degree in meteorology and decades of being a weather nerd. So, let’s get into it.

Unstable vs Stable
In order to determine what the atmosphere is capable of for the day, we must first understand the difference between unstable and stable air. When the air is stable, the weather is likely to be relatively uneventful. Precipitation can occur in stable air conditions, but it is usually slow and steady. Weather conditions are not likely to change quickly. Unstable air, by contrast, means rapidly changing weather conditions, heavy precipitation, and storms. A good way of determining the air stability is to observe clouds throughout the day. When the air is stable, if any clouds form they will tend to “spread” horizontally. In unstable conditions, clouds will grow uninhibited vertically, sometimes reaching massive heights.

Cloud Basics
One of the most important tools for forecasting weather in the field is understanding clouds. There are two main types of clouds, stratus and cumulus. Stratus are usually flat or shallow, and are indicative of stable weather. Cumulus on the other hand, are those puffy popcorn balls you see on a summer day. Cumulus clouds are a great way to monitor the stability of the air, as they are usually associated with unstable air.

Valentin de Bruyn / CotonThis illustration has been created for Coton, the cloud identification guide for mobile., CC BY-SA 3.0 <https://creativecommons.org/licenses/by-sa/3.0>, via Wikimedia Commons
Cirrus
Cirrus are high, whispy, thin clouds that indicate high winds aloft. They are usually a good indicator of high pressure and stable air.
Nimbostratus
These thick, heavy precipitation producers are usually an indicator that conditions aren’t likely to change rapidly. They usually don’t contain enough energy to be lightning/thunder producers, but can still produce steady precipitation.
Towering Cumulus
Cumulus congestus, more commonly known as towering cumulus, form when cumulus clouds experience growth in unstable air conditions. Basically, they are the middle stage between cumulus and cumulonimbus clouds. If you see cumulus starting to grow upwards into towering cumulus, it’s a good indicator to start planning your descent.
Cumulonimbus
These clouds are a sign to get off the mountain now. Cumulonimbus are storm producers; their towering heights a result of very unstable, moist air. These clouds produce lightning, heavy precipitation, and sometimes hail and tornadoes.
Special Type: The Denver Brown Cloud
This is for my fellow Front Rangers. The Denver Brown Cloud is a nickname given to the layer of smog that sits over Denver and is visible from the Foothills/High Country. The phenomenon is caused by a layer of stable air, known by meteorologists as an “inversion” or “cap”, trapping smog and pollutants below it. While the Brown Cloud is associated with stable air, it’s not a reliable forecasting tool. Often in the summer, inversions act like a lid on a boiling pot; trapping convection below. When the atmosphere below the inversion is warmed enough to “break the cap”, strong storms can develop rapidly.

Afternoon Hazards
In parts of the Intermountain Region of the US, it’s common knowledge that when attempting a summit, you want to be off the peak before noon. In the hiker’s paradise of Colorado, like clockwork almost every day in the summer, afternoon thunderstorms roll through the high country. But why is this the case? A thunderstorm requires a few basic ingredients: warm temps, moisture, and rising air. In Colorado, warm temps in the mountains (60+) occur mostly in the summer months. Warm air contributes to atmospheric instability, allowing clouds to grow upwards uninhibited. Colorado’s geographic location is responsible for the next ingredient, moisture. Colorado sits in the perfect position for upper level winds to bring in moisture from the Gulf of Mexico or the Pacific during the late summer monsoon season. Moisture is important because it is necessary to form clouds. The final main ingredient is rising air. In mountainous regions, we actually have two different methods of rising air. The first being our topography. The mountains can act as a mechanism for physically pushing the air upwards. When the air is forced to rise, it expands and with enough moisture, forms clouds. In unstable air conditions, these clouds then continue to rise upwards and grow into thunderstorm clouds. Another mechanism for rising air is convection. Convection occurs when the hot summer sun heats the ground, causing air to rise upwards. Because this “perfect storm” of ingredients is present on most summer days in Colorado, afternoon thunderstorms can be an almost daily occurrence.
In regions where afternoon thunderstorms aren’t as common, you still want to get an early start on your above-treeline adventures, especially when there’s still a layer of snow on the peak. This is because as the temperatures reach their climax around the afternoon hours, more snow and icemelt occurs. Not only does this make hiking conditions more treacherous and difficult, but it can also increase the chances for dangerous rock falls. You may be groaning at the thought of waking up at 4am to start hiking, but the view of the sun rising over the mountains makes it all worth it, trust me.

Things to look for when the sky is partially obscured
When you can’t see the full scape of the sky, there are other signs of a potential thunderstorm to be aware of:
Sudden increase in winds. Often times you can feel the inflow and the outflow of an approaching storm
Humidity, When we have a humid day, you can often feel it in the air. One days where the air feels heavy and wet, or when your hair begins to frizz, there is usually a good chance a thunderstorm will develop.
Thunder/lightning. You can often see lightning and hear thunder even when the storm is miles away. A good time to hightail it back to the car.
Sudden Changes in Temp If the temp suddenly drops, it’s a good sign a thunderstorm is approaching

Forecasting Tools
The National Weather Service is the most accurate forecasting service. Because their forecasting centers are localized, you get the most accurate weather readings and forecasts for your area. If you’re using a site that provides 10+ day forecasts, know that generally forecasts are the most accurate 1-3 days out. According to the National Atmospheric and Oceanic Administration, a 7 day forecast is accurate about 80% of the time while a 5 day forecast is accurate about 90% of the time. Contrast this with a 10 day forecast which is generally only right about half of the time. We don’t yet have the tools to accurately predict the weather for the whole month or season. Sorry Farmer’s Almanac fans. Also, don’t rely on hourly forecasts, like the ones available on your smartphone, for accuracy either. While they can sometimes be accurate, it’s extremely difficult to accurately predict the weather down to an hour by hour basis. Especially in places like Colorado where the weather can change rapidly. (Cuts to NOAA and the NWS aren’t helping either, but that’s a discussion for another day). A good doppler radar app can also be helpful for the backyard forecaster. RadarScope is the best, but if you don’t want to drop $12 on an app RadarOmega is a good, free alternative.

Hopefully now you have a better understanding of what to look for next time you hit the trails. As always, if you’re unsure about the clouds gathering in the distance, it’s better to err on the side of caution and turn around. The trail will still be there next time.